Ok so today, Dec 17th is my birthday. My grandson (who just turned 2 on the 13th) learned to sing the happy birthday song and he says "Happy birthday to meeeeeeee" and raises both hands in the air! lol! So I figured I would steal the line from him...(can ya see me raising my arms? lol!)
Anywho, earlier this week I recd some advance money bday gifts and went (what else?) SHOPPING!!! :) So I thought I'd show you some of what I have gotten so far. I still have presents to open later today....I am so excited! This has really helped to pick up my spirits, but then again shopping usually does.
On other news I got hired to work at the Scrapbook Expo in Costa Meza, CA and CHA in Anaheim, CA in January and I am very excited and happy about that. I will be working for Scrapbooks N Stickers http://www.scrapbooksnstickers.com/ and I get to see some friends I don't get to see enough!
Well here is the video of my bday goodies....I'll be back soon! Thanks for looking!

Wednesday, December 16, 2009

Saturday, December 5, 2009
~*~ Pretty Pockets ~*~
I hope you enjoy this tutorial for my pretty pockets. They are used to hold tags in your mini books and they look really great. I hope you like them and that you are able to use them in your next mini!
Thursday, December 3, 2009
A couple weeks ago
I won a $20 gift card from Custom Crops www.customcrops.com for a post I made on one of their you tube videos. Check them out at You Tube and leave a comment they pick winners every week.
Anyways with the gift card I purchased a We R Memory Keepers Corner Chomper (yay!) I have been wanting one! and Tim Holtz Adage tickets....They just came in todays mail! yippee!! Thanks Custom Crops!
Also happy birthday to my brother in law "R"!!!
Anyways with the gift card I purchased a We R Memory Keepers Corner Chomper (yay!) I have been wanting one! and Tim Holtz Adage tickets....They just came in todays mail! yippee!! Thanks Custom Crops!
Also happy birthday to my brother in law "R"!!!

Tuesday, December 1, 2009
Trudy's designs become stamps!!
Go over to True's Gifts From The Heart http://truesgiftsfromtheheart.blogspot.com/ and help Trudy celebrate her new clear stamps! Some good blog candy goin on there! Way to go Trudy!
Monday, November 30, 2009
Some yummy blog candy!!!
All Scrapbook Steals blog is giving away some pretty awesome blog candy!!!http://www.allscrapbooksteals.blogspot.com/ just have a looksie! So run don't walk to enter and check out their awesome prices too!

Fabric Tag Tutorial
Hi everyone! I made my first tutorial video (I suck at editing! bwahahahahaha) Hope you enjoy the idea and also that you can incorporate it into your next project.
Part 2 of my haul
Whoops! I forgot to come back and post part 2 of my bingo winning haul after I filmed it, so here it is! Come back soon!
Sunday, November 15, 2009
STEPHANIE IS HAVING A GREAT GIVE AWAY WITH 2 CHANCES TO WIN!
All you need to do is stop by her blog WITH A GRIN. COM
http://withagrin.blogspot.com/2009/11/thankful-for-black-friday-giveaway.html
subscribe and leave a message and you could be one of two lucky winners! You just have to go there and check out what you can win!!!!!!!!!
http://withagrin.blogspot.com/2009/11/thankful-for-black-friday-giveaway.html
subscribe and leave a message and you could be one of two lucky winners! You just have to go there and check out what you can win!!!!!!!!!
Friday, November 13, 2009
I went shopping!!!
Hi everyone...I won some money at bingo and went shopping!!!!!! I found some really great deals at Michaels. You can see most of it on my video. This was my very first video and my very first time messing with You Tube and I really don't know how I got this far! lol! Guess I was pushing all the right buttons! Thanks for looking and have a good rest of the week!
Friday, October 16, 2009
I won! I won! Clip it Up Contest!
Simply Renee Inc (The fabulous Clip It Up company) had a contest and I won $75.00...waaa hooooo! I used the money to buy....what else....a Clip it Up!!! Waaa hooo! You can see the announcement here
http://simplyreneeinc.blogspot.com/2009/10/winner-is.html
http://simplyreneeinc.blogspot.com/2009/10/winner-is.html
Thursday, October 1, 2009
I won! I won! Day 11 at Spellbinders!
I could not believe when I got an email from them telling me I won day 11!!! waaaa hoooo! I got so many goodies I cannot wait to play with them! You can look here to see what I won! Thank you so much Spellbinders!!!
http://spellbinderspaperarts.com/blog/day-11-winner-oh-my/
http://spellbinderspaperarts.com/blog/day-11-winner-oh-my/
Friday, August 21, 2009
Finally a new project to upload! lol!
Gosh, it has been a long time since I have had the time or inclination to scrap. I made this mini book for a friend's teenage daughter who is crazy about Zac Efron as much as I am about Matthew! lol! It is for her birthday and I sure hope that she likes it! I mixed pages from those $1.00 mini albums that were sold at Michaels and I tried to keep it young and bubbly looking which I think I achieved. I used all sorts of embellies. Thanks for looking! I hope to add more soon!


Sunday, April 12, 2009
A Springy layout of my baby Bandit
This is for the blog A True Friend found here http://a-true-friend.blogspot.com/2009/04/challenge-44.html They present challenges for scrapping your pets....cute idea I might say!

Monday, February 16, 2009
Have a money saving tip for you!
First let me apologize for not posting for a while. My life has been really a mess the last few months. I am trying to move on so I am going to try and post again more often. Thanks for your understanding.


I LOVE the look of the tiny Making Memories stickers on cards and layouts. Kristi (Kiber) at Scrapbook.com did an amazing job on her Altered Art piece where she used them to spell out "you hold the key to my heart" as seen below. Thanks Kristi for letting me show your work!
Well, since I cannot find them at any stores near me (just on line where I don't do much shopping) I decided to look around all my stuff to see what I could come up with. So here it is.......
I had a pack of self adhesive mailing labels (the kind you run through your printer, I think they run $3.50 for a pack of (10) 8.5 by 11 sheets at Target) and a Fiskars squeeze punch called Brick by Brick. I printed letters out on the adhesive sheet and used the punch to cut them out (see photo on left side). I know they are a bit wider than the Making Memories kind so I also cut the letters out with scissors to get narrower strips as another option see photo on right side. I personally like the ones made with the squeeze punch....the letters can be placed centered, up top or down on the bottom. (The second photo shows those done with the squeeze punch). The fonts are only limited to what you have on your computer as are the colors and sizes. You could also use adhesive backed cardstock in the same way if you wanted other than a white background. Hope you can use this idea in your creative projects!
Thursday, December 4, 2008
Some more info to pass on to you!
This is such a beautiful mini book that Leah over at Life with Lou has created http://lifeaslou.blogsome.com/2008/12/04/christmas-mini-album-the-cover-and-other-details-and-a-little-contest-give-a-way/trackback/ She tells you how she did it and she has a RAK too so go have a look!
Sorry I have nothing else new to post...we are still packed for a move but keep getting postponed...ugh! I am so thinking I need to tear open my boxes with scrap goodies so I can get back to scrappin and posting here.
Thanks for being patient with me! :)
Sorry I have nothing else new to post...we are still packed for a move but keep getting postponed...ugh! I am so thinking I need to tear open my boxes with scrap goodies so I can get back to scrappin and posting here.
Thanks for being patient with me! :)
Saturday, November 22, 2008
Just wanted to pass this on to all of you!
As far as I go, still have not moved...some personal issues keeping me here, so still all my goodies are packed away!
I recently won a wonderful prize from a challenge at Scrapbooks N Stickers......a Bind it All and lots of goodies to go with it! Thanks Kim! Do check it out http://www.scrapbooksnstickers.typepad.com/

I recently won a wonderful prize from a challenge at Scrapbooks N Stickers......a Bind it All and lots of goodies to go with it! Thanks Kim! Do check it out http://www.scrapbooksnstickers.typepad.com/
Monday, October 6, 2008
I Will not be posting for a bit.....
I am in the process of packing to move so all my scrapping goodies are in boxes...waaahhhhh! I am not sure when the boxes will be unpacked but when they are you can be sure I will be back with more ideas! Until then, take care!
Wednesday, September 17, 2008
Sharing my idea binder with you!!
Hey everyone! Well I really needed to not only re-do my idea binder, but I also needed to weed it out and update it. Seems that over time likes and dislikes change and it is important to do this from time to time. So I used to use a regular note book and grew tired of it. I got several of these American Crafts Albums at Big Lots (really cheap! lol!) and decided I would use it for this.
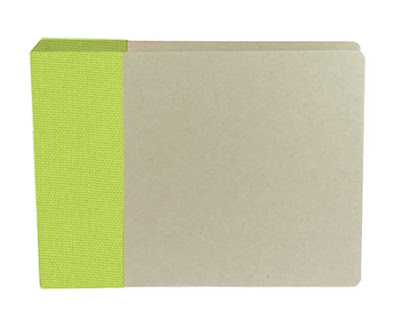 So y'all know I am in LOVE with Basic Grey's Color Me Silly line, and I have used it to alter most organizational items for my scrap space. So here is what it looks like now.......

Here is what it looked like before I started...
So y'all know I am in LOVE with Basic Grey's Color Me Silly line, and I have used it to alter most organizational items for my scrap space. So here is what it looks like now.......
Here is what the inside is like and the dividers for each section (on the left are pictures that inspire me) I have the sections broken down as follows:
1. Printouts - this is for ideas that I find on the net and print out. Some times I just save things to the computer but I also like being able to access some of them while I am not on the puter (which is rare! lol!)
2. Templates - Some times I make my own templates like large flowers, or circles and to aviod making them again I save them in page protectors here. I usually make them from a light weight chipboard so that they will last.
3. Sketches - Some times I print out sketches for fast reference and keep them here. I also am in the process of altering a rol-o-dex to save sketches in also. I have a nicely bound sketch book that my friend Renee made for me as well. (guess I have them all over! lol!)
4, Poems and Quotes - In this section there are also page titles and other "words" that I may see on a layout while browsing a gallery, blog or really anywhere, that I might want to use on future projects.
5. Miscellaneous - All the odds and ends that I don't know what to do with like copies of on line orders, upcoming events, etc. Thanks for looking and I hope that I have inspired you to pay some attention to your own idea binder!


Thursday, September 11, 2008
I am a bad bad blogger! lol!
I am so bad that I almost forgot how to sign in to my blog! so sorry! Anyways just wanted to add a quick idea that I was playing around with and I think it is quite nice!
I was wanting some texture to some flowers for a book I am working on and the idea hit me to try the red velvet ribbon you see in the photo (it is plastic backed) in conjunction with my Big Shot and yay! It works! Even with sizzlits. Just use the ribbon as you would paper.....and great thing is that it is pretty inexpensive for lots of it! Now if I can just find more colors....lol! Enjoy!

I was wanting some texture to some flowers for a book I am working on and the idea hit me to try the red velvet ribbon you see in the photo (it is plastic backed) in conjunction with my Big Shot and yay! It works! Even with sizzlits. Just use the ribbon as you would paper.....and great thing is that it is pretty inexpensive for lots of it! Now if I can just find more colors....lol! Enjoy!
Tuesday, August 19, 2008
A Great Idea To Share!
So with it being the Back to School time of year, we are able to find all sorts of school supplies to alter and create with. You know the ever famous compostition notebooks, pencil cases sort of things. Well I have a new idea ! I was walking through my local office supply store (Staples) checking out all the back to school deals and came across these vinyl binders in tons of colors and just knew they could be used for more than a notebook....and best part they were only 25cents each!!!!
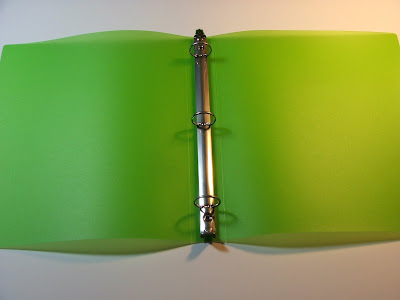
And just look at all the color choice there are! (I am on the lookout for more!)

So what I am suggesting you do is cut the covers off the notebooks and save all the parts. The covers are what I will be using to give you ideas. However, the metal binder rings can be used for other things as well. What you ask? Well you can nail them on a piece of wood and hang items from the loops like ribbon or packaged embellishments, or you can use them to make a chipboard album by attaching them to the chipboard with brads through the holes on each end.....(let me know what else you think of!!)

Now what can we do with the covers? Well here are just some ideas....and again please post and let us know if you think of any others!!!
We can use our die cut machines to cut out shapes and letters! For those who have a Cricut, when the new 2" blades come out, we should be able to cut this material! yippee! Oh and just think of these die cuts in the ever popular acrylic albums! (I bet they would look awesome!)

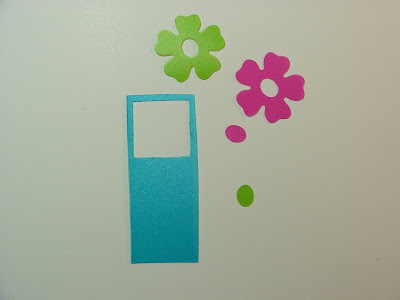
Don't throw away the part you are left with after you cut the die out. It can be used as a template. You can also ink or paint inside the cut out. Maybe use glue and glitter!

Then you can use scissors to cut just around the outside edge of the flower for a whole different die cut look!

You can use pieces as elements for "windows" in your cards or scrapbook pages!

And last idea I have for you is you can use it to make covers for mini albums. You can even make pages to mix in with pages of an acrylic album!
So run out and get the notebooks cheap while you can!!! Enjoy!

Subscribe to:
Posts (Atom)